

Ever opened a brand‑new bar of handmade soap, only to find it shriveled up like an old raisin by the time you get to use it?
We’ve all been there – that moment when the fresh scent fades and the lather turns more like sand than silk. It’s frustrating, especially when you’ve invested in a lovingly crafted bar from a local artisan.
What if I told you the secret isn’t in the soap itself, but in how you store it?
In our experience at Evolve Botanica Co, the simplest tweaks to your bathroom routine can keep your soap as soft and fragrant as the day it left the workshop.
First, think about moisture. Hand‑made soaps love a little air, but they hate sitting in a pool of water. A well‑ventilated soap dish – something with slats or a raised platform – lets excess water drain away, preventing the soap from turning mushy.
But here’s a twist: if you’re a fan of those cozy, steamy showers, try moving the soap out of the direct spray zone. A little distance means the bar dries between uses, yet still stays warm enough for a luxurious lather.
Now, what about the dreaded soap slick? Some folks swear by a tiny sprinkle of cornstarch or baby powder on the bottom of the bar. It absorbs leftover moisture and creates a barrier that keeps the rest of the soap dry.
And for those who love a rustic vibe, a simple wooden soap saver works wonders. The wood naturally wicks away humidity, and it adds a charming touch to your countertop.
Got a travel habit? Slip your soap into a breathable fabric pouch – cotton or muslin – rather than a sealed plastic bag. The fabric lets the bar breathe, while still protecting it from dust and debris.
So, next time you reach for that gorgeous lavender‑infused bar, remember these storage hacks. A little airflow, a dash of powder, and the right spot can extend the life of your handmade soap dramatically.
Ready to give your soap the TLC it deserves? Let’s dive into the step‑by‑step guide that shows you exactly how to store handmade soap for peak freshness.
TL;DR
Want your lavender‑infused bar to stay soft, fragrant, and slip‑free for weeks? Learn how to store handmade soap with simple airflow hacks, a dash of powder, and the right dish.
Follow our quick guide and you’ll keep every bar fresh, luxurious, and ready for that perfect lather every morning daily.
Step 1: Choose the Right Storage Container
Picture this: you just unwrapped a gorgeous lavender‑infused bar, and a few days later you notice the edges looking a bit dull, the scent fading. It’s not the soap’s fault – it’s the container you chose. The right storage container is the first line of defense against moisture, air, and that dreaded soap‑slip.
In our experience at Evolve Botanica, the simplest containers—think slatted soap dishes or raised platforms—do the heavy lifting. They let water drain away instead of pooling, which keeps the bar from turning mushy. If you’ve ever left a soap in a flat dish and watched it turn into a sad, soggy pancake, you’ll get why airflow matters.
So, what should you look for? Here’s a quick checklist:
- Material: Ceramic, bamboo, or stainless steel with built‑in ridges.
- Design: Open‑air slats or a raised slot that lifts the bar off the surface.
- Size: Just enough room for the bar to breathe, but not so big that it slides around.
Does a wooden soap saver sound fancy? It is, and it actually wicks humidity away. We love pairing our seasonal soaps with a small maple wood saver – it’s functional and adds a rustic vibe to the bathroom.
And here’s a pro tip: if you have a shower that sprays straight down, place the dish a foot or two away. The bar still gets that warm, steamy ambience, but it has time to dry between uses. It’s the sweet spot between “too wet” and “too dry.”
Want to dive deeper into picking the perfect soap? Check out our guide on Finding the Best Handmade Soap Near Me: A Practical Guide – it walks you through how to match containers with different soap formulas.
Now, let’s talk about a common mistake: using plastic containers. They trap moisture, turning your bar into a slippery mess. Even a decorative glass bowl can become a mini greenhouse for humidity. Stick with breathable materials and you’ll notice a difference within a single use.
Ready for a visual demo? Below is a short video that shows how different containers affect a bar’s texture over a week.
Notice how the slatted dish keeps the soap firm, while the flat plastic plate leaves it soft around the edges. The contrast is pretty clear.
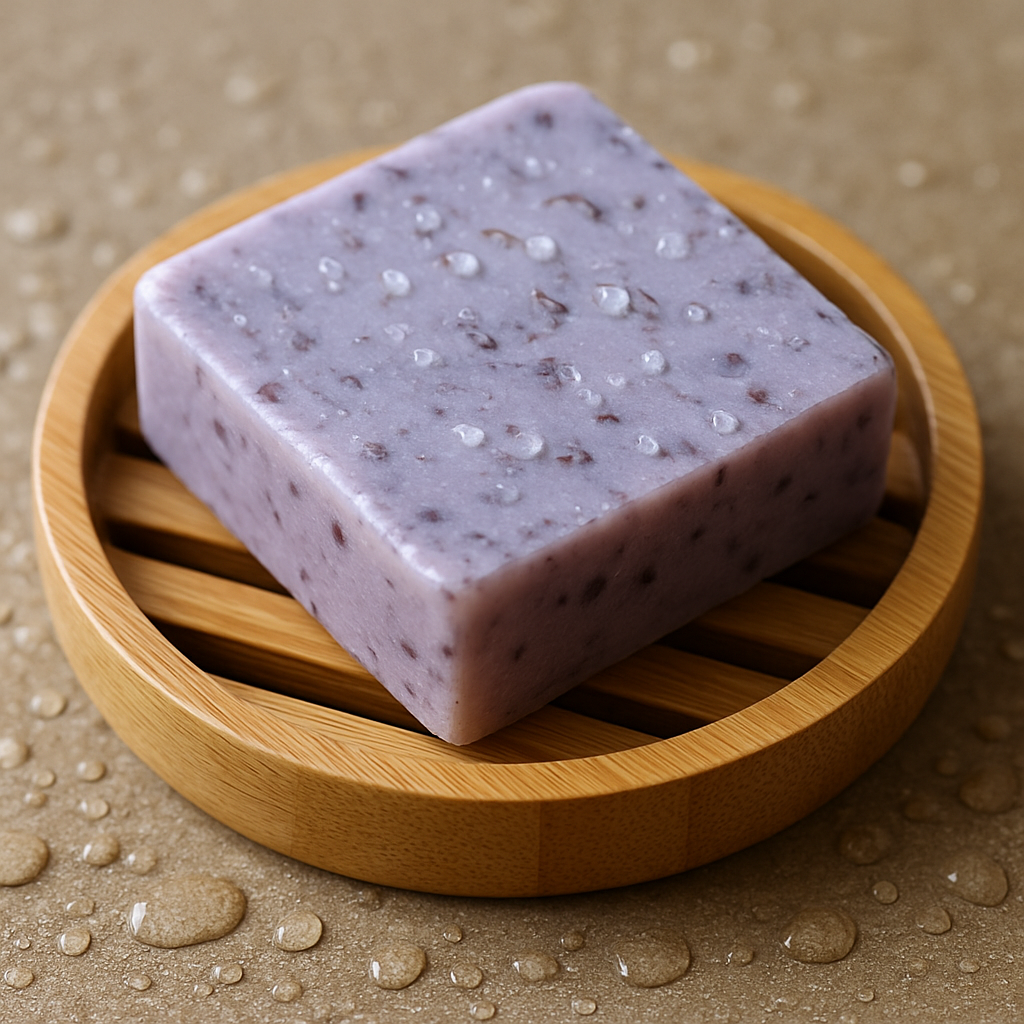
Another factor is the bathroom’s overall humidity. If you live in a damp climate, consider a small shelf with a built‑in vent or a decorative tray that sits near a window. A little extra airflow goes a long way.
And finally, think about the routine. After each shower, give the bar a quick pat with a towel to remove excess water, then let it sit on the dish for a minute before you walk away. It’s a tiny habit that adds up to big results.
Step 2: Clean and Dry Your Soap Properly
You’ve just lathered up with a gorgeous lavender‑infused bar, and now you’re left with a little puddle of water and maybe a speck of soap residue. It’s that tiny mess that, if ignored, turns a fresh bar into a mushy, smelly disappointment over a few weeks. So, how do we keep our handmade soap looking and feeling like it just left the workshop?
First thing’s first – do you really need to rinse every single bar after each use? The short answer is yes, but the how matters just as much as the what.
Rinse off residue
After you finish a shower, give the bar a quick swipe under lukewarm water. You’re not trying to wash the soap clean, just pushing off the thin film of shampoo, conditioner, or body wash that can cling to the surface.
- Hold the bar under a gentle stream for 2–3 seconds.
- Rotate it so all sides get a brief rinse.
- If you have hard water, a quick dip in distilled water can prevent mineral buildup.
Pat dry, don’t toss it
Now comes the part most people skip: drying. Instead of tossing the bar onto the counter and hoping it’ll dry on its own, give it a gentle pat with a clean, lint‑free towel.
- Press a corner of the towel against the bottom of the bar for 5–10 seconds.
- Flip the bar and repeat on the opposite side.
- Leave the towel on a dry spot of the countertop so it doesn’t re‑wet the soap.
Air‑flow matters
Even after you’ve patted the bar, it still needs a little breathing room. A slatted soap dish or a wooden soap saver creates a tiny gap where air can circulate and carry away any lingering moisture.
- Place the bar on the raised ridges, never flat on a surface.
- If you’re using a wooden block, make sure it’s sealed or lightly oiled to avoid warping.
- Swap the bar’s position every few days so the same side isn’t constantly in contact with the dish.
Special cases – humid bathrooms & travel
Living in a steamy climate or taking your favorite bar on a weekend getaway adds a few extra steps.
- In a high‑humidity bathroom, keep a small dehumidifier or open a window after showering to cut the moisture in half.
- For travel, wrap the bar in a breathable muslin pouch after you’ve rinsed and patted it dry – the fabric lets air move while protecting the soap from dust.
- A quick “soap‑saver” hack: slip a thin sheet of parchment paper between the bar and the dish; replace it when it gets damp.
Notice how the video walks through each step in real time – from the gentle rinse to the towel pat, then onto the slatted dish. It’s a visual reminder that a few seconds of care now saves weeks of wasted soap later.
Bottom line: a quick rinse, a light pat, and a spot that lets air do its thing are the three pillars of keeping your handmade soap fresh. Try this routine tonight, and you’ll see the difference the next morning when you reach for that silky bar.
Step 3: Use Proper Packaging Materials
Okay, you’ve rinsed, patted, and gave your bar a nice spot to breathe – now what about the stuff that protects it when you’re not using it? The right packaging is like a cozy blanket for your soap; it keeps moisture out, dust away, and your fragrance intact.
Why packaging matters
Hand‑made soap is porous, which is great for lather but also means it can absorb humidity from the air. If you toss it in a sealed plastic bag, that trapped moisture can turn a buttery bar into a soggy slab in a few days. On the flip side, a breathable wrap lets the soap stay dry while still shielding it from bathroom dust and accidental splashes.
Breathable fabrics are your best friend
Think muslin, cotton gauze, or even a light linen pouch. Slip the bar in after you’ve given it a quick pat dry, then fold the top over. The fabric’s tiny gaps let air circulate, so the bar never sits in its own sweat.
We’ve seen customers stash their lavender‑infused bars in a muslin drawstring bag while traveling, and they come back smelling fresh as the day they left. The key is to avoid anything that traps steam – no zip‑lock bags unless you plan to use the soap within 24 hours.
Paper alternatives: parchment or kraft
If you prefer a disposable option, a single sheet of parchment paper works wonders. Place the bar on the sheet, then fold the edges over the sides. When the paper gets a little damp, just replace it – it’s cheap, biodegradable, and keeps the soap from sticking to the dish.
Kraft paper is a bit sturdier. You can cut a small “envelope” that fits your bar snugly. The natural fibers breathe, and the brown color adds a rustic touch that looks great on a vanity shelf.
Reusable silicone or bamboo sleeves
Some folks swear by silicone sleeves because they’re waterproof on the outside but have tiny perforations inside. They’re easy to wash and can be reused forever – perfect for the eco‑conscious soap lover.
Bamboo “tubes” are another option. A bamboo tube with a cut‑out interior holds the bar upright, and the natural wood wicks away any stray moisture. Just give it a light oiling every few months to prevent cracking.
How to choose the right material for your routine
Ask yourself three quick questions:
- Do I need something travel‑ready? If yes, go for a lightweight muslin pouch.
- Do I want a reusable, zero‑waste option? Silicone or bamboo sleeves fit the bill.
- Do I prefer a simple, disposable wrap? Parchment or kraft paper does the trick.
Once you’ve picked your wrapper, there’s a tiny habit that makes a huge difference: always wrap the soap after you’ve patted it dry, not before. A dry surface means the fabric won’t cling to moisture, and you avoid that icky “wet spot” you sometimes see on the dish.
Pro tip: combine packaging with storage
Place your wrapped bar on a slatted soap dish instead of a flat surface. The combination of airflow from the dish and breathability from the wrapper gives the soap double protection. It’s like giving your bar a two‑piece ventilation system.
And if you’re stacking multiple bars (say you’ve bought a bulk set for the holidays), separate each one with a thin layer of parchment. That way, no bar leaches moisture into the next – each stays crisp and ready.
Bottom line: proper packaging isn’t just about looking pretty; it’s a science of moisture management. Choose breathable fabric for travel, paper for quick swaps, or reusable silicone/bamboo for a green routine. Pair it with a good soap dish, and you’ll keep your handmade soap fresh, fragrant, and ready for that perfect lather every time.
Step 4: Store in a Cool, Dry Place
So you’ve wrapped the bar, gave it a quick pat‑dry, and found the perfect slatted dish. The next move that often gets overlooked? Tucking your soap into a cool, dry spot where it can actually “rest” between showers.
Why temperature and humidity matter
Hand‑made soap is basically a bundle of natural oils and glycerin. Those ingredients love a bit of air, but they hate heat and moisture because they’ll pull water from the surrounding air and turn your silky bar into a crumbly brick. In fact, a quick look at the science behind soap shelf life shows that exposure to warm, humid air speeds up oxidation, which can dull fragrance and even cause rancidity over time according to tub‑therapy.com.
That’s why the golden rule for how to store handmade soap is simple: keep it cool, keep it dry, keep it out of direct sunlight.
Choosing the right spot in your home
Here are a few everyday places that fit the bill, plus a quick pros/cons rundown so you can pick the one that matches your bathroom vibe.
| Location | Pros | Cons |
|---|---|---|
| Pantry or kitchen cupboard | Stable, cool temperature; low humidity; easy to reach | May be near food odors if not sealed |
| Bathroom linen closet | Away from shower steam; often dark, which protects color | Can become humid if the bathroom lacks ventilation |
| Spare bedroom drawer | Consistently dry; no direct light; can store multiple bars | Requires a separate container or breathable wrap |
Notice how each option emphasizes “cool” and “dry.” If you live in a humid climate, you might even consider a small dehumidifier tucked into the bathroom or a silica‑gel packet in the storage drawer – cheap tricks that make a big difference.
Practical steps to set up your cool zone
1. Pick a container. A simple cardboard box with a few ventilation holes works wonders for bulk bars. If you’re storing just one favorite lavender bar, a reusable muslin pouch (the kind we love at Evolve Botanica Co) does the job without trapping steam.
2. Layer it right. Place a thin sheet of parchment or a piece of cotton cloth on the bottom of the box. That extra barrier soaks up any stray moisture and keeps the soap from sitting directly on a damp surface.
3. Space it out. If you have multiple bars, give each a little breathing room – think “one‑inch gap” rather than a tight stack. This mimics the airflow you get from a slatted dish but on a larger scale.
4. Label the shelf. Write the date you first used the bar. Handmade soaps generally stay at peak performance for about 12 months, so a quick note helps you rotate older bars to the front.
What about the occasional summer heatwave?
When the thermostat spikes, pull the soaps into a cooler cabinet or even a low‑temperature pantry. If you have a basement that stays around 65°F (18°C), that’s prime real‑estate for your soap stash. Avoid the fridge – the humidity inside can be a silent killer.
And don’t forget the occasional “air‑out” day. Every few weeks, take the bars out, give them a minute of fresh air, then pop them back into their cool spot. It’s a tiny habit that keeps the glycerin from getting too clingy.
Quick checklist before you walk away
- Is the chosen spot at least 60°F (15°C) and away from direct sunlight?
- Is the humidity below 50%? (A hygrometer can help.)
- Do you have breathable wrapping or a ventilation‑friendly container?
- Have you left a small gap between each bar?
If you can answer “yes” to all four, you’ve nailed the art of how to store handmade soap for maximum freshness.
Step 5: Rotate Stock and Monitor Shelf Life
Ever opened a brand‑new bar only to find it past its prime because it sat at the back of the cupboard for months? That feeling of waste is why rotating your soap stash is a tiny habit that pays big dividends.
Think of your soap collection like a fridge. The items you need most are the ones you keep front‑and‑center, while the older ones get nudged to the back. The same idea works for handmade soap – you want the freshest bars within arm’s reach and the older ones gradually moving forward.
Why shelf life matters
Hand‑made soaps usually stay at peak fragrance and lather for about twelve months, but after that the glycerin can start pulling in ambient moisture, the oils may oxidize, and the scent can fade. In our experience at Evolve Botanica Co, a bar that’s been tucked away for a year still looks pretty, but it often feels a bit “dry‑out” when you lather.
So, how do you keep track?
Label, date, repeat
The easiest trick is a simple label. Write the date you first used the bar on the underside of the wrapper or on a small sticky note stuck to the soap dish. A quick glance lets you know which bars are nearing the twelve‑month mark.
If you prefer a tech‑free approach, use a marker to dot the bottom of each bar with a different colour for each month. When the colour fades, you know it’s time to move that bar forward.
Rotate like a carousel
Every time you pull a fresh bar from the shelf, slide the older one one spot toward the front. It only takes a second, but it creates a natural first‑in‑first‑out system.
For larger collections, consider a shallow tray with dividers. Place the newest bars in the leftmost slots and the oldest in the rightmost. When you restock, add the fresh batch on the left and let the whole line shift right as you use each bar.
Does this sound like extra work? Not really – it becomes a subconscious motion you do while reaching for your soap each morning.
Quick rotation checklist
- Label each bar with the start‑date.
- Store bars in a single‑layer tray or on a slatted dish.
- Move the oldest bar to the front after each use.
- Check the dates weekly – a glance is all it takes.
Spot‑checking shelf life
Beyond dates, give each bar a quick “feel test” every few weeks. Does it still feel supple? Does the scent pop when you press it?
If a bar feels unusually hard, crumbly, or the fragrance is muted, it’s probably past its prime. You can still use it for a gentle hand wash or as a pre‑shave scrub, but it’s time to retire it from your main stash.
Another easy cue is colour. Many of our lavender‑infused soaps gradually lose that vibrant hue after a year. A faded shade is a visual reminder that the bar’s shelf life is winding down.
Using the "air‑out" day to your advantage
Once a month, take every bar out of its container, give each a quick breath of fresh air for a minute, then return it to its spot. This tiny habit helps evaporate any lingering moisture that might be hiding in the pores.
Combine the air‑out day with your rotation routine, and you’ll notice fewer bars turning mushy during humid summer weeks.
When to discard
If you spot any orange‑tinged spots, a sour smell, or a slick film that won’t wash away, those are signs of mold or excess glycerin breakdown. It’s safest to toss those bars – they won’t harm you, but they’ll ruin the experience of a good lather.
For bars that are simply past their fragrance peak but still solid, repurpose them as a soap “saver” for your bathroom floor or a gentle hand‑cleanser for gardening.
Remember, the goal isn’t to be obsessive; it’s to give each handmade bar a fair chance to shine before it quietly fades.
By labeling, rotating, and giving a quick once‑a‑month check, you’ll keep your soap collection tasting, smelling, and lathering like it just left the workshop – every single time.
Step 6: Label and Track Expiration Dates
Ever reach for a lavender bar only to notice the scent has faded and the texture feels off? That's the moment you realize you never wrote down when that bar first left the workshop.
Labeling isn’t just paperwork – it’s the GPS for your soap stash. When you can see at a glance how long a bar has been sitting, you’ll know exactly when to rotate, use, or retire it.
What to write on each label
Start with three bits of info: the name of the soap, the date you first used it, and the “best‑by” window. Most handmade soaps stay fresh for 12 months, but fragrant blends or high‑glycerin formulas can start losing their mojo after about nine months.
Choosing a label material that lasts
We’ve tried sticky notes, masking tape, and even chalk‑on‑the‑soap – they all wash away eventually. A small piece of waterproof cardstock or a blank label sticker works best. Write with a permanent‑marker that won’t smudge when you pat the bar dry.
Got a spare set of wine‑bottle tags? They’re already water‑resistant and come in handy sizes. Just punch a tiny hole and thread a thin cotton cord through the bar’s “tail” (the little nub you trim off after cutting). The cord doubles as a hanging loop for your dish.
I like “YY‑MM‑DD” because it sorts chronologically in a notebook. Example: 24‑03‑15 means the bar started its life on March 15, 2024.
If you’re more visual, add a small colored dot next to the date – green for “fresh”, yellow for “approaching”, red for “use soon”. It takes a second to glance at the dot and you’ve got the whole story.
Digital tracking – the low‑effort alternative
Not a fan of paper? Grab a free note‑taking app on your phone and create a simple table: Soap name, Start date, Expiration date, Notes. Set a monthly reminder to review the list, and the app will ping you when a bar is within 30 days of its “best‑by”.
If you prefer spreadsheets, a one‑column “=TODAY()” formula can automatically highlight rows that are older than 365 days with conditional formatting. No need to stare at a messy drawer.
Quick checklist before you stash
- Write soap name and start date on a water‑proof label.
- Add a color‑coded dot or small sticker for visual cue.
- Place the label on the bar’s “tail” or attach a thin cord.
- Enter the same info into your phone or spreadsheet.
- Set a monthly calendar reminder to review the list.
Picture this: you pull out a “Citrus Burst” bar, see a bright green dot, and know it’s still in its prime. A week later, the dot turns yellow – you move that bar to the front of the dish and use it before the scent wanes.
And if you ever forget, the “air‑out” day we mentioned earlier doubles as a sanity check. While you’re giving each bar a minute of fresh air, glance at the labels; any bar that looks dull or sticky probably needs a quicker finish.
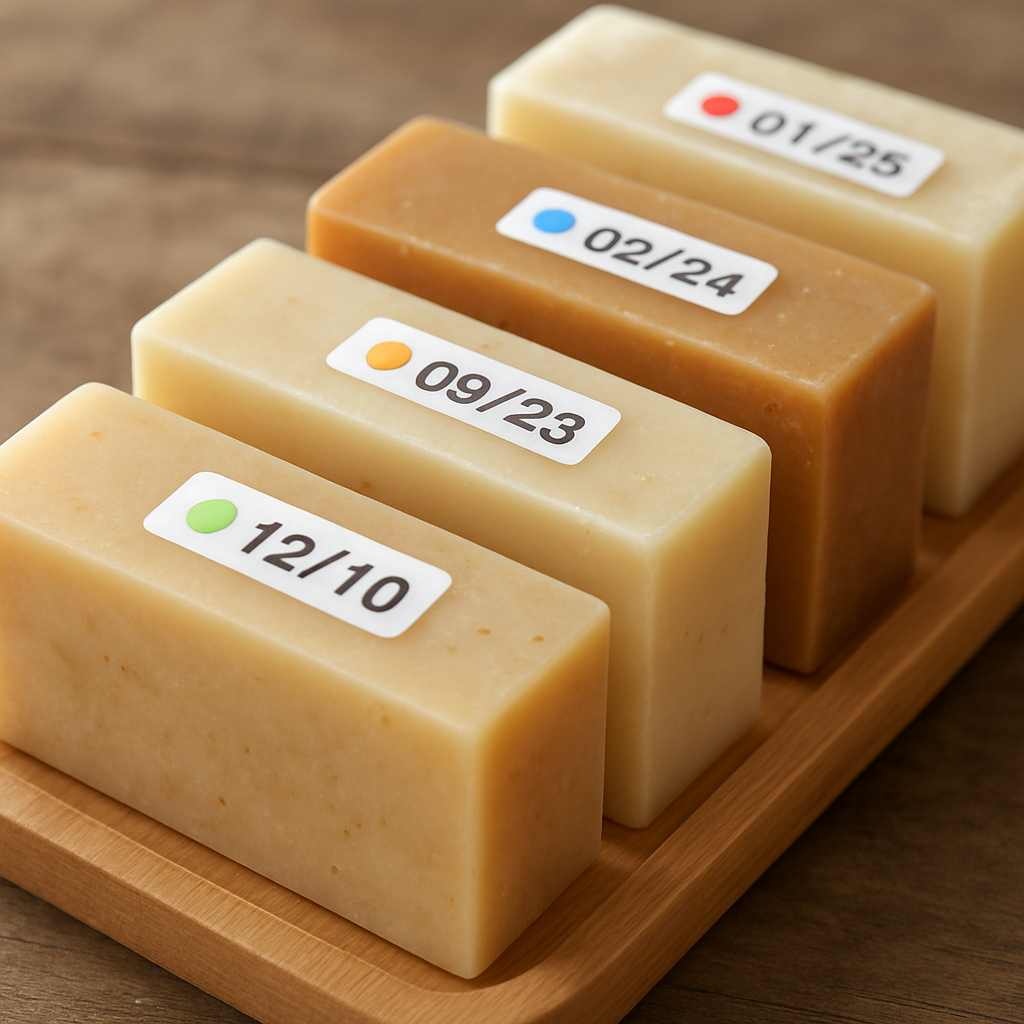
Bottom line: a few seconds of labeling now saves you weeks of wasted lather later. Pick a system that feels effortless, whether it’s a tiny cardstock tag or a phone spreadsheet, and make checking the dates part of your weekly routine. Your future self (and your nose) will thank you.
Conclusion
Alright, you’ve walked through airflow hacks, drying routines, smart packaging, cool‑dry zones, rotation tricks, and labeling tricks. If you’ve followed along, you already know that the secret to long‑lasting lather is less about fancy gadgets and more about simple habits that respect the soap’s natural chemistry.
Key takeaways
• Keep the bar on a slatted dish or wooden saver so moisture can escape.
• Give it a quick rinse, pat dry, and let air do the rest.
• Wrap it in breathable fabric or parchment, then store it in a cool, dry spot away from direct sun.
• Label each bar with a start date and color‑code the freshness – a tiny visual cue saves weeks of wasted soap.
• Rotate your stash like a carousel; the oldest bars move to the front after each use.
Your next step
Pick one habit you haven’t tried yet – maybe the “air‑out” day or the color‑dot label – and add it to your routine this week. You’ll notice the difference the next time you reach for that lavender bar, and the scent will still feel like it just left the workshop.
In our experience at Evolve Botanica Co, a few seconds of mindful storage translate into months of fresh, fragrant soap that makes every shower feel like a mini‑spa. So go ahead, set that reminder, label those bars, and let your soap shine for as long as you need it.
FAQ
What’s the best way to keep my handmade soap from getting soggy after each shower?
After you finish showering, give the bar a quick 2‑second rinse under lukewarm water, then pat it dry with a lint‑free towel. Place it on a slatted soap dish or a wooden saver so air can circulate under the bar. If you like extra protection, slip a breathable muslin pouch or a sheet of parchment on top—but never seal it in plastic. This routine keeps glycerin from pulling in moisture and stops the soap from turning mushy.
Can I store my soap in the bathroom cabinet, or is a different room better?
Storing your soap in the bathroom cabinet can work if the space stays cool and dry, but most bathrooms are steam‑filled zones. A pantry or kitchen cupboard usually maintains a steadier temperature and lower humidity, making it an ideal backup. If you prefer to keep it nearby, choose a linen closet away from the shower, add a silica‑gel packet, and ensure the bar rests on a breathable surface. The key is to avoid direct sunlight and trapped moisture.
How long will my handmade soap stay fresh, and how do I know when it’s past its prime?
Hand‑made soap generally stays at its peak for about twelve months, though high‑glycerin formulas may start losing fragrance after nine. Keep an eye on three signals: a faded color, a muted scent, or a hard, crumbly texture. If the bar feels unusually dry or the fragrance has dulled, it’s time to use it quickly or repurpose it for a hand‑wash or scrub. A simple label with the start date makes spotting the age effortless.
Do I need special containers or can I DIY a soap holder?
You don’t need an expensive soap dish; a DIY cardboard box with a few ventilation holes works just fine for bulk bars. If you prefer something sturdier, a slatted stainless‑steel tray or a reclaimed pine block provides the same airflow while adding style. The rule of thumb is: the bar should never sit flat on a solid surface. Elevate it on ridges or slats so water can drain away and the soap can breathe.
What role does temperature play in how to store handmade soap?
Temperature is a silent thief when it comes to how to store handmade soap. Warm air accelerates oxidation of the natural oils, which can mute the fragrance and even cause a slight rancid note after several months. Aim for a storage spot around 60–70°F (15–21°C) and keep it out of direct sun. If your home gets hot in summer, move the stash to a cooler basement or pantry for a few weeks.
Is it okay to use plastic zip‑lock bags for short‑term storage?
A zip‑lock bag is fine for a day‑or‑two when you’re traveling, but it traps steam and turns the bar soggy in the long run. For short‑term storage, slip the soap into a breathable muslin pouch or wrap it in parchment paper—these materials let moisture escape while keeping dust out. If you must use plastic, open the bag occasionally to let fresh air in, and replace it with a breathable wrap as soon as you get home.
0 comments